Wednesday 27 June 2012

CASE for Elebration!

Hello friends, it's been a while I know!


     I have been crafting, crafting, crafting in preparation for my inspiration station at the next quarterly training in Bicester, which is now less than three weeks away! (Want to come? Ask me how!) Because I am working mainly on things for this, unfortunately I can't show them until after the event in case there are some other Pink Ladies or Lads visiting my blog! I would really hate to ruin the surprise! Be sure to check back after the 15th of July to see all my pretties.


     In addition to crafting, the past 11 days I have been concentrating on getting back in shape after baking lots of cinnamon rolls and food for the gods at Christmas time, and eating too many potatoes and ice cream lollies whilst on vacation in April! Once upon a time I lost 6 stone or so, but have been making excuses as to why I "can't" work out for over six months! Needless to say I won't bore you with my exercise regimes on this blog, but I will tell you I've spent a bunch of time concentrating on changing the way I do things and losing some inches, and so have neglected blogging. Sorry for that! Hopefully I'm back on track now, but trying to keep losing inches at the same time.


     In between the various items I have created for my inspiration station, I had to occasionally take a break from trying to spawn a brainchild and just do something easy. I had to CASE something. In the Stampin' Up! world, as some of you may already know, CASE stands for Copy And Share Everything, or just Copy And SharE if you prefer. For this particular item, I flipped through my trusty Idea Book & Catalogue and found something cute I wanted to copy.


     When copying things, sometimes you may not have exactly what is shown in the picture. I myself have not got around to purchasing things like certain packs of DSP, as I'm still working on the loads I already have and try not to go overboard on pretty paper. There is an easy solution to this, just work with what you do have! I didn't have the particular colour used in this card, so I found a colour I liked that I did have and went with that. And you know what? I actually like my version better than the original!
     This is the original that I found on the A La Carte page in the IB&C. There are a number of things I don't have for this: That particular "happy birthday" stamp from Teeny Tiny Wishes (don't worry, it's on my not-so-teeny-tiny wish list), Subtles Patterns DSP, or Subtles Brads. Eh, well, we can't have everything! That's what the world tells us, anyway!

    And some things I just didn't want to use. That's the beauty of this. You get to do it your way. Don't like something? Don't do/use it! I didn't want to cut into a whole sheet of 12x12" textured Pumpkin Pie cardstock just for a little scallop accent, I wanted to use some scraps instead. That scrap basket is continuously filling out and sometimes I just need to do my best to cut it down and stop it from bulging so fast! So I did.

     Ok so their lighting is better, they've set the scene, and had a professional photographer take the photo. In no way do I claim to be a photographer, I just do my best to get the stuff I'm photographing in some light without a silhouette of me and my camera casting a shadow across the thing.

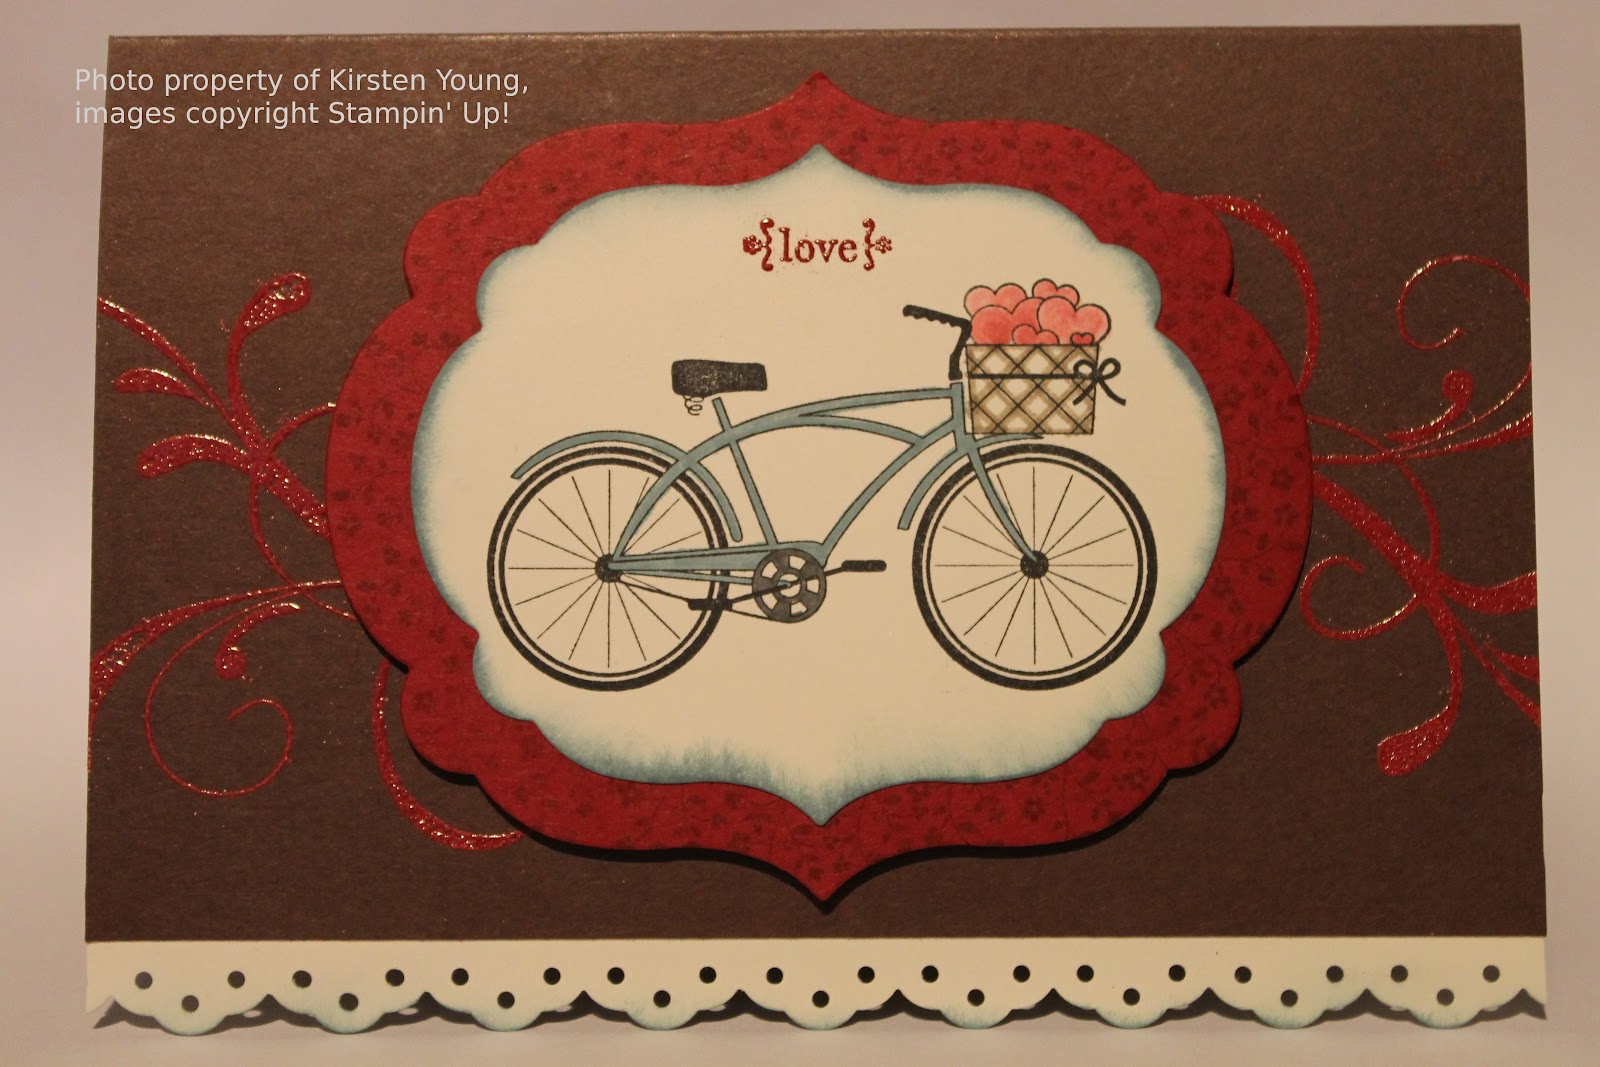
     Anyway, I hope you like it, because I really do! I think I've made it a little more girly, with the pinks and purples and the Tempting Turquoise background. Plus I'm a huge fan of my watercolouring skills here as I'm still rather new at watercolouring and not everything I've tried has looked good. On this card, I think my little elephant looks just perfect! The balloon looks perfect, the bow is great, I love it.

I used: Elebration and For My Family stamps, Scallop Trim Border punch, Brights Brads, Linen Thread, Textured Tempting Turquoise, Whisper White, Certainly Celery and Regal Rose cardstock, Getting Started Collection Patterns DSP, Basic Gray ink, Watercolour pencils, and and Aqua Painter.

     I tell you what, I love those watercolour pencils! They are just so much fun! My little boy did his own elephent while I was doing mine, I shall show you once he's glued it all together to finish his card! He did such a fantastic job, I showed him the basic concept and away he went! He loves doing these things as it's a great way to spend time with his mommy. Awwwww! He owes it to me, really, do you know how many alien and superhero games I've played over the years? (Rhetorical question, of course!)

     So there you have it, my version of this cute birthday card! And the fact that I have been able to get this blog post done is a cause for celebration! Notice the pun in the title? Did ya? Did ya? Huh? Yes, I do think I'm funny. Just ask my husband.

Until next time folks, and hopefully that time will be in the very near future, Happy Crafting!

If you're just itching to try some crafting out yourself, give me a shout! It's much easier than it looks! And what you don't know how to do, you can easily learn! Go on... try it! :)


Saturday 9 June 2012

Bright Blossoms and Lace Curtains

Hello again friends and visitors,

     Today I bring you some flowers and sunshine, which is interesting considering the weather outside is rainy with gale force winds!

     Wanting to rise above the rainy, cloudy, windy day feeling, I decided to play with a stamp set called Bright Blossoms to cheer myself up. Bright Blossoms is a lovely little set, quite inexpensive as well, with lots of interchangeable images.

     When I took this set out to start crafting, all I could think of was vases sitting on windowsills. I reached in my scrap bin and pulled out a piece of cardstock that seemed just big enough, and it happened to be Crumb Cake. I found another piece of Whisper White that was slightly smaller, and was at first going to just layer the white over the Crumb Cake. I looked through my larger scraps and found a long piece of Blushing Bride 29.6cm x 10.5cm, so I scored that at 14.8cm and had a card with a long flap rather than the traditional a5 card.  Still the same size when folded, but it's half an a4 sheet the long way and not the short way.

     So now I had my Whisper White, Crumb Cake, and Blushing Bride. Well, it just so happens that I recieved from Stampin' Up! a product I had ordered a while back that was out of stock, some StazOn White (Opaque) ink. I was a bit disappointed that it didn't come with the rest of the order I had placed with it, but I do love seeing the UPS man! He's my own personal Santa.

     Unlike Whisper White Craft Ink, the white StazOn ink (also from Stampin' Up!) does not require lenghty time to dry nor does it require heat-setting. It's perfect for stamping onto surfaces like plastic, glass, and anywhere that you may need a permanent image. The pad comes un-inked, to prevent drying out in the warehouse. I simply had to put about a teaspoonful of the ink onto the pad, and massage the ink into it with the ink bottle's nozzle. Then, after a minute, I was ready to use it!

     At first I was looking for a way to stamp something into the background with the StazOn, but couldn't decide on a stamp to use for this. I was thinking of using the Delicate Doilies set for the background, but upon looking at the stamps in that set I decided that one of them looked a bit like a sun, and that I could stamp it in the corner of the white piece of card. Spontaneous inspiration!
     It was the one with the points that reminded me of a sun, so I stamped it in So Saffron with some Peach Parfait daubed in the centre. I then decided to make this into a window setting, so used my Word Window punch to cut out the inside of the Crumb Cake. I used Simply Scored first to run a score line 1/2" in from all sides to form a rectangle, just for a guide. This way I didn't have to mess with a ruler and pencil, and a score line is much easier to see than a pencil line anyhow. So I punched along the score line, thereby cutting out the inside bit and creating for myself a frame for my window.

     I stamped the Crumb Cake frame with the Woodgrain background stamp in the white StazOn ink, and daubed the inside and outside edges with Early Espresso. In doing this, I discovered that when you daub colour over the white StazOn ink, it will not ink where the white StazOn has been stamped. Must keep that in mind for future reference!

     To finish my window setting, I used Bright Blossoms, Stampin' Write markers and my Stamp-a-ma-jig to position the vases and flowers exactly where I wanted them, with every piece in the colour I wanted. So easy! I knew where I was going to put my window, and wanted to spice up the background "wall" a bit, so cut up one of the Nursery Nest Designer Series Papers into strips and stuck it to the Blushing Bride background.

     Since I had now created what seemed to be a piece of a room (most likely a kitchen) with a window looking out into the sunshine, I wanted to put some curtains on the window. Lace curtains seemed most appropriate since most curtains in England seem to be lace. I thought Vellum paper would do very well for this, as it is quite transparent, so stamped with the largest image from the Delicate Doilies set onto it with the white StazOn ink. I was so impressed because it looks just about as close to lace as you could possibly make with stamps on paper!

     Originally I wanted the curtains to hang vertically, and be gathered at the sides, but wasn't too sure how the Vellum paper would take to folding. I knew I wanted to use the Eyelet Border punch along the bottom, so did that, and decided to score just at the very top of the piece of Vellum paper to test how it would act when folded. It made a very tight crease, and as I messed with it I decided it looked nice folded horizontally, so kept with that and made it look like a Roman shade.

     To create the Roman shade look, I scored in a pattern of 1/2", 1/4", 1/2", 1/4", and so on, and folded the 1/4" wide strips behind the 1/2" strips in a pleated fashion. I punched holes in the pleats on the left side with the 1/16" circle handheld punch and threaded white Baker's Twine through it. I tucked the end behind the top of the curtain and adhered the Vellum paper to the Blushing Bride card with a long piece of Sticky Strip. At the end of the piece of Baker's Twine I made a paper bead, coloured it with a marker, tied a knot to keep it in place, and frayed the end a bit to make it look like a tassel.

     Before sticking the window onto the wall, I punched three tiny holes at the bottom of the window frame, and attached some mini silver brads. I stamped three teacups from the Tea Shoppe set, cut them out, and hung them from the brads, securing the window to the card with Tombow glue and securing the teacups with dimensionals to make them a little more 3D.

     And then I had..... THIS!


     If you skipped over the blah, blah, blah part and when straight to the photo, here's a list of what I used:

Stamps/stamp sets: Bright Blossoms, Delicate Doilies, Tea Shoppe, Woodgrain
Paper: Blushing Bride, Crumb Cake, Whisper White, Nursery Nest DSP, Vellum paper
Ink: White(Opaque) StazOn ink pad, Riding Hood Red, Blushing Bride, Pear Pizazz, Baja Breeze, So Saffron (all in marker form), Peach Parfait, Early Espresso (with sponge daubers)
Punches: Word Window punch, Corner punch, Eyelet Border punch, 1/16" circle punch
Embellishments: Baker's Twine, Mini Brads (silver)
Other: Simply Scored, Sticky Strip, Tombow mulitipurpose glue, Dimensionals

     The hanging teacups remind me of a cup-rack I built in the US. I covered it with coloured tissue paper and glue in a plaid pattern, and put a bunch of hooks in it. I installed it beneath a cupboard and we were then able to display our collection of mugs (I really like mugs, especially ones I've painted) in a cute way rather than putting them away out of sight. This card really creates a bit of a nostalgic feel for me and makes me feel like huckleberry coffee is brewing and pancakes are on their way to my plate. Makes me smile. :)

   Lengthy one, I know, but I hope it's brightened up your day just a bit!

Thanks for reading, and Happy Crafting!


Wednesday 6 June 2012

Tea Shoppe

Welcome!

     Fancy a cuppa?

     Today I bring you a couple of creations made with the new Tea Shoppe stamp set. This was honestly not at all one of my favourites at first, but it has gradually grown on me. It features a fantastic "Just for You", a dotted border for the Modern Label punch, and much more!
    This cute little box was inspired by Michelle Last's little treat box I recieved several months ago. It is so simple yet so effective, just a piece of card 8" x 4", scored at 4" in the middle (creating two sections 4" x 4"), then a score line pulled from halfway down the edge (@ 2") to the top of the centre score line, and the same done toward the bottom of the centre score line. Simply fold along the lines, punch holes at the top and thread a ribbon through to tie it shut! Hopefully by the shadow in the picture you can tell that it is a 3D treat box, which may help you to imagine what I was trying to explain.

     The sentiment "Just for You" and the dotted frame came from the Tea Shoppe set. Also used were the Woodgrain stamp, Bird punch, Scallop Circle punch, Modern Label Punch, smallest circle punch from Itty Bitty Shapes punch pack, Chocolate Chip, Night of Navy and Real Red inks, Crumb Cake, Very Vanilla, Garden Green and Real Red cardstock, Color Spritzer tool, mini silver brads, and some Victoria Crocheted trim.

Here is what you will get in the Tea Shoppe stamp set:

     Whenever browsing stamp sets, always think of them in pieces rather than one whole stamp. With the helpful invention of Stampin' Write Markers, You can colour your stamps in any combination of ways. You can use just parts of the stamp, you can make it multicoloured, the possibilities are endless! For example, instead of using the stamp with the three little cups which comes as one piece, I stamped each one in a different colour and cut them out and stacked them up. While I would love to claim it was my idea, it was actually a CASEd (CASE = Copy And Share Everything) idea from a very talented lady. Her name is Amanda Burditt, and it wasn't until I saw a card she made with the teacups in bright colours that I actually wanted to give this set a closer look!

     For this card I used the Tea Shoppe stamp set, Patterns Designer Series Paper (getting started pack), Marina Mist and Whisper White cardstock, Regal Rose, Rich Razzleberry, Marina Mist, and Sahara Sand ink, VersaMark, white embossing powder, Pearls, a Big Shot, Swirls and Scribbles die, Framelits, Edgelits, and Adorning Accents embossing folders.

    I have been recently playing with the new Framelits and Edgelits dies for the Big Shot, but this is the first time I've got to use the new embossing folders that coordinate with the Edgelits dies. Since they are designed in the US, and standard US cards are about 1cm smaller than ours, the embossing folders don't quite stretch across the entire length of our cards. To counteract this, I strategically placed the Framelit cutout just over the embossed scallops so I could snip in between two scallops and just spread them apart to reach the ends of my card.

     The Edgelits dies, however, are just long enough to cut the length of an A5 sized card, so no issues there. If you've never seen them, they are just long pieces of some kind of metal, flat on one side and with a sharpish ridge on the other side. Two come in the package, with an envelope to store them as they would easily get lost without it. You can ensure they stay put with just a sticky note, and with the help of the Big Shot (my love!) they instantly give you a fancy edge to your card. Check out the Summer Mini catalogue on the left-hand side of this page for some more examples!

     I did have a lot of fun playing with this set, and after telling myself for ages I didn't even like it, I now can't wait to play with it again! I have seen it used by some talented fellow demonstrators in small cards that contain a wrapped teabag inside, which I can't wait to try myself! "A CUP OF THANKS"  is a perfect sentiment for it, very clever.

     What do you think? Does this set suit you "to a tea"? Which stamp is your favourite? How would you use it/like to see it used? I'd love to hear from you!

Thanks for reading, don't let your tea go cold (as my husband is constantly telling me!), and Happy Crafting.


Exclusive Stamps!

It's good to be a hostess!

Why?

     When you host a qualifying workshop (crafting party) or place a qualifying order, not only do you get at least £25 in freebies of your choice, but you have EXCLUSIVE access to certain stamp sets and other special goodies!

     In the main catalogue, one of the special hostess sets is a very useful one with loads of different Happy Birthday messages. It's called Happiest Birthday Wishes. I made a very simple card with this set last night using just a bunch of differently sized and coloured circles pressed onto Very Vanilla cardstock using the Big Shot and an embossing folder.
     I've used Crumb Cake, Chocolate Chip, Rose Red, Rich Razzleberry and Very Vanilla cardstock, Chocolate Chip ink, Decorative Label punch, 3.4", 1", and 1-14" circle punches, the small circle from the Itty Bitty Shapes punch pack, Big Shot, Square Lattice embossing folder, and some Victoria crocheted ribbon.


This card is perfect for any woman whose birthday you've managed to forget, and my son could have made it, it's so easy.


     The exclusive hostess stamp set from the new Summer Mini is called Pedal Presents, and it features a bicycle with a basket and lots of little images such as flowers, hearts, balloons etc to put "in" the basket. I had a play with it tonight and really enjoyed myself!

     I used Pedal Presents, Tiny Tags and Everything Eleanor stamp sets, Chocolate Chip, Very Vanilla and Cherry Cobbler cardstock, Basic Black, Cherry Cobbler, Baja Breeze, Basic Gray and Crumb Cake ink, VersaMark and Cherry Cobbler embossing powder, Eyelet Border punch, Big Shot and new Framelits dies.


This is a good month to stock up on loads of wonderful Stampin' Up! goodies! They're good for the soul! Have you thought about hosting your own workshop soon? It's so easy! And so much fun! Get in touch with me ASAP!


That's it for today, but I hope you stop by again soon!


Thanks for reading, and Happy Crafting!

Monday 4 June 2012

June Freebies!

Is it June already??

It is! Where did May go? And so quickly! Oh my...

Before we get too far into June, I have to tell you about what Stampin' Up! is offering this month!


     It says it right on the picture, you can get a FREE package of Designer Series Paper when you buy three in the month of June! There are so many to choose from, why not have a peek in the IB&C and the Summer Mini and find your favourites? Just click the links on the left-hand margin of this page.

     Secondly, this is a great month to host a workshop! For workshops whose sales exceed £325, Stampin' Up! is giving hostesses an extra £30 of hostess pounds (to use on ANYTHING) for free! That's in addition to the £50 of hostess pounds you would already earn for hosting that kind of workshop, totalling £80 of FREE GOODIES and one item at 50% off!!
     What have you had your eye on that you would love to get for FREE? A Big Shot? What would you get for 50% off? The whole set of markers so you can have unlimited stamping capabilities? Why not host a workshop? You could possibly earn them just for your hospitality and for inviting people you know!

     For more information about these things and more, visit www2.stampinup.com or get in touch with me via any of the ways under the Contact Me tab at the top.

I'll have pictures and more for you very soon, but until then, Happy Crafting!