With the recent release of the Summer Mini Catalogue, and all the excitement involved with it, I decided to take a small detour today and cover a notebook using only items from the main catalogue (IB&C). Not only did I have some Designer Series Paper in my drawer that needed to be used, I remembered that I have a birthday party coming up in a couple of weeks and need to do some practising!
Sometimes I'm a wife and mother, other times I'm a crafter, and sometimes I am a saviour for mums who need something for their daughters to do during their birthday party; Things that don't involve supervising a whole group of kids in public. Crafty birthday parties are really gaining popularity, and as cinemas and bowling are so expensive these days, I offer my services for less than the cost of those options.
For the party I'll be doing in mid-May, the mum has requested that the girls cover notebooks. The last notebook I covered was one that I bought from the pound store, and while it looked really pretty when I was done with it, I dropped it one time and it started falling apart. Now, if I were one of these girls, I wouldn't want to spend my time and effort making a really cool notebook only to have it falling to pieces the next day. Solution: I went to my favourite online everything-vendor and bought a few packages of A5 notebooks that were only slightly more expensive, and from a reputable company. They are of much better quality and I'm sure the girls will be pleased; I am!
Covering a notebook is not very difficult and if done properly, it can look very sophisticated. My next attempt will probably look more sophisticated than this one, but for the purpose of this tutorial this is just fine.
Now on to the instructions...
First, you need to get yourself a notebook. The more plain the better, because patterned notebooks tend to cost more, and there's really no point in paying extra for something you're going to cover up. I have chosen a hard-bound notebook to cover, size A5.
Next, choose your paper. I am using some Paisley Petals DSP for the outside of the notebook, and some Naturals Ivory cardstock to cover the inside panel. Make sure the paper you use to cover the outside is longer than the cover flaps. I was able to use a single 12"x12" sheet of DSP for this one notebook, but to do that requires a seperate strip of paper about 3" wide for covering the spine and the edges of the other paper. If I'm not making much sense yet, just keep reading, it gets better.
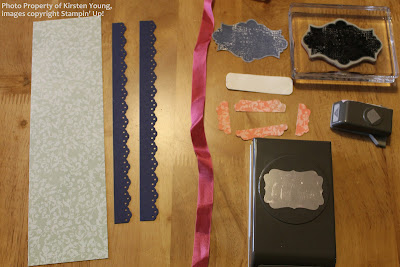
Here you can see I have the notebook (whose logo I have cropped out of the picture), two pieces of my DSP which I have cut 6" wide and 2" longer than the cover flaps, and two pieces of Naturals Ivory cardstock, each of which is size A5, or half a sheet of A4 paper.
To cover the spine I have a 3" strip of more Paisley Petals DSP, which also measures a few inches longer than my notebook. I have a few more embellishments I'd like to add as well. They are two strips of Night of Navy card punched with the Eyelet Border punch (not pictured), some Rose Red Seam binding ribbon (in the end I also decided to use some Very Vanilla 1/8" taffeta ribbon which is not pictured), and some other pieces for the cover decoration.
I punched the four sides from the Decorative Label punch from another pattern of Paisley Petals DSP, and used the Corner punch to trim the corners off a strip of Very Vanilla cardstock. I used an image from the Everything Eleanor set to stamp the large label in Night of Navy ink onto Very Vanilla cardstock, and cut it out with my paper snips.
From Bravo Burgundy cardstock, I have die-cut the letters to spell "notes" and have sponge-painted them with Champagne shimmer paint, which I diluted with a bit of water. With all my embellishments as organised as can be, I can now get to work on actually covering the notebook!
I like things to be straight, even, and perfect, so I always do a bit of aligning and forming before I apply any sort of glue. On both sides of the book, with both large pieces of DSP, I lay the paper over the book and rub around the edges to get some crease lines. This will help me know exactly how and where to place it once the glue is applied, but I also want to know exactly how big the little corner pieces are, because they need to be cut out.
The little corner bits need to be cut out because the little flaps you see here are going to be folded over soon and I want everything to go smoothly.
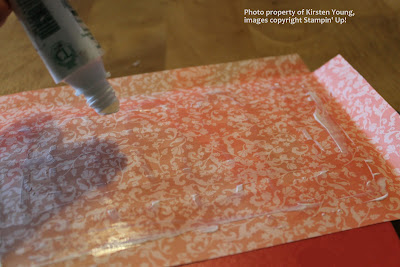
Now that I have fitted the panel, I can put Tombow glue all over it and stick it on, making sure to pay attention to the positioning. I want it exactly where it was before I put the glue on it.
Because I am so particular about this sort of thing, I fold down the shorter flaps before I fold the longer flap down, all the while making sure everything is as perfect as can be. I do this to cover the outside of the front and the back of the book.
Next I want to adhere the punched embellishment to both sides of the long strip of DSP, which must be done before I attach it. This is to ensure my notebook looks as professional as possible when it is finished.
Now I want to line up the spine of the book with the binding strip, checking it's straight, and glue it on. A Bone Folder is handy for this step, as it helps glue the paper down flat, without bulges or bubbles. Make sure to use just the right amount of glue at all times, not too much and not too little. Don't put glue on the part past the end of the book just yet, that will happen later.
Just another shot of how I applied the binding strip, make sure not to do this when the book is open as it won't fit well in the end, and make sure to make the paper follow the indents of the spine.
With the book closed and the binding strip mostly attached, I need to cut little notches out of the paper that's hanging off. This is why it's important not to have put glue on this part in the previous step. I'm going to be tucking the strip on the end of the spine into the book, so I want to make sure it's narrow enough to fit between the covers when the book is closed. Also, I've left it long enough so it will stay put once it's tucked.
To tuck in the piece of the binding strip, I open the book a little to create a bit of wiggle room behind the body of paper. Once I've tucked it in, I glue down the other pieces. Repeat this step for the top and bottom of the binding.
-Now would be a good time to add a place-marking ribbon, simply put some glue where the little flap was tucked and insert a ribbon. This time, I didn't want one.
Now I want to attach the ribbon. On the front cover, I use my Snail adhesive to run a long, continuous strip of adhesive starting right on the edge of the binding strip (not onto the punched strip of Night of Navy). I need to do this a second time as well, with the second length of adhesive partially overlapping the first, so that the adhesive is exactly as wide as the ribbon. That way my ribbon will always stay flat, and is less likely to get caught on anything at any point in time.
I put a bit more Snail adhesive on the inside of the cover to hold the ends of the seam-binding ribbon, and at this point I also attached the same length of Very Vanilla taffeta ribbon, holding the ends down on the inside flap with a tiny bit of Sticky Strip.
Now to put together the label for the front. I glue the four pieces of DSP, which I had punched out earlier with the Decorative Label punch , to the back of the label from the Everything Eleanor set.
I glue on the strip of Very Vanilla which I have distressed with a file, and glue on the letters. I can now attach the label to the front of the notebook.
Now that I've got all the pieces of the front covers attached, I can complete the final step, which is to adhere the panels onto the inside of the book to hide all my loose ends. In addition to all the glue in the centre of the panel, I make sure to run a thin strip of glue (not pictured, sticky strip would also work but might be a bit bulkier) around the perimeter of the panel so the edges won't peel up in the future.
One way to attach the inner panels easily is to put all the glue on it and, while holding it in exactly the spot you want, just close the flap. This is the back flap of the notebook, clearly less embellished than the front.
On the lower part of the inside back cover, I use the Handcrafted stamp which bears the copyright symbol of Stampin' Up!, so I'll be in accordance with the Angel Policy in case I choose to sell this notebook.
All done!
This is only my second attempt at covering a notebook, but I can already tell you that I definitely prefer the feel of this one to the last one, at least as far as quality is concerned.
First attempt
I'm not yet big on using DSP on cards (getting there slowly) and I haven't done much scrapbooking yet (getting there also) so I am thrilled to have a good use for the DSP at this time. The particular pack used today was free, by way of some promotion several months ago, and I haven't done anything with it until now. I'm still not sure it's really my style, but maybe someone else out there thinks it's just fantastic!
Even if that's not true, the principle is still the same and hopefully this tutorial has served its purpose, to spark some inspiration. ;) Why not have a go yourself?
Comments, shares, etc. are much appreciated!
Thanks for reading, and as always, Happy Crafting!
Post pictures of your creations at
for periodic chances to win prizes!


No comments:
Post a Comment