Tuesday 3 July 2012

Everyday Enchantment

Hi everyone, I have some really really great news!!!


     During the month of July, not only do you have a chance to order the special Everyday Enchantment Designer Series Papers for only £9.95, but for your purchase of £45 or more, you can get the special Everyday Enchantment coordinating ribbon and brads pack for FREE!


     I love this ribbon so much, it's so sparkly and perfect! You get a whopping 10 metres per roll, in Calypso Coral and Lucky Limeade! I think it looks fabulous with the watermelon slice from the Mouthwatering set, and you may remember my post from before with the little notelets I made with this paper, ribbon and the matching brads. At the time I posted it (I just couldn't resist) all these things were quite unavailable to us here in the UK. I apologise if this frustrated you, but you might be thanking me now for giving you some ideas for using these products!


     They haven't brought back the coordinating stamps, but perhaps you have some leftover from Sale-a-Bration earlier this year? Even if you don't, I wouldn't miss this chance to grab these amazing ribbons and brads for FREE!
     The papers have some great images too...


This is likely to be the last chance you will ever have to get these exclusive products, don't hesitate to place an order or book your workshop today!

For more details, visit Stampin' Up!'s website here. To place your order, email me @ kirsten_marie@live.co.uk or visit my facebook page: www.facebook.com/TheScrapDragon

That's all for today, I must get back to crafting! Have a great day, and Happy Crafting to you all!

Wednesday 27 June 2012

CASE for Elebration!

Hello friends, it's been a while I know!


     I have been crafting, crafting, crafting in preparation for my inspiration station at the next quarterly training in Bicester, which is now less than three weeks away! (Want to come? Ask me how!) Because I am working mainly on things for this, unfortunately I can't show them until after the event in case there are some other Pink Ladies or Lads visiting my blog! I would really hate to ruin the surprise! Be sure to check back after the 15th of July to see all my pretties.


     In addition to crafting, the past 11 days I have been concentrating on getting back in shape after baking lots of cinnamon rolls and food for the gods at Christmas time, and eating too many potatoes and ice cream lollies whilst on vacation in April! Once upon a time I lost 6 stone or so, but have been making excuses as to why I "can't" work out for over six months! Needless to say I won't bore you with my exercise regimes on this blog, but I will tell you I've spent a bunch of time concentrating on changing the way I do things and losing some inches, and so have neglected blogging. Sorry for that! Hopefully I'm back on track now, but trying to keep losing inches at the same time.


     In between the various items I have created for my inspiration station, I had to occasionally take a break from trying to spawn a brainchild and just do something easy. I had to CASE something. In the Stampin' Up! world, as some of you may already know, CASE stands for Copy And Share Everything, or just Copy And SharE if you prefer. For this particular item, I flipped through my trusty Idea Book & Catalogue and found something cute I wanted to copy.


     When copying things, sometimes you may not have exactly what is shown in the picture. I myself have not got around to purchasing things like certain packs of DSP, as I'm still working on the loads I already have and try not to go overboard on pretty paper. There is an easy solution to this, just work with what you do have! I didn't have the particular colour used in this card, so I found a colour I liked that I did have and went with that. And you know what? I actually like my version better than the original!
     This is the original that I found on the A La Carte page in the IB&C. There are a number of things I don't have for this: That particular "happy birthday" stamp from Teeny Tiny Wishes (don't worry, it's on my not-so-teeny-tiny wish list), Subtles Patterns DSP, or Subtles Brads. Eh, well, we can't have everything! That's what the world tells us, anyway!

    And some things I just didn't want to use. That's the beauty of this. You get to do it your way. Don't like something? Don't do/use it! I didn't want to cut into a whole sheet of 12x12" textured Pumpkin Pie cardstock just for a little scallop accent, I wanted to use some scraps instead. That scrap basket is continuously filling out and sometimes I just need to do my best to cut it down and stop it from bulging so fast! So I did.

     Ok so their lighting is better, they've set the scene, and had a professional photographer take the photo. In no way do I claim to be a photographer, I just do my best to get the stuff I'm photographing in some light without a silhouette of me and my camera casting a shadow across the thing.

     Anyway, I hope you like it, because I really do! I think I've made it a little more girly, with the pinks and purples and the Tempting Turquoise background. Plus I'm a huge fan of my watercolouring skills here as I'm still rather new at watercolouring and not everything I've tried has looked good. On this card, I think my little elephant looks just perfect! The balloon looks perfect, the bow is great, I love it.

I used: Elebration and For My Family stamps, Scallop Trim Border punch, Brights Brads, Linen Thread, Textured Tempting Turquoise, Whisper White, Certainly Celery and Regal Rose cardstock, Getting Started Collection Patterns DSP, Basic Gray ink, Watercolour pencils, and and Aqua Painter.

     I tell you what, I love those watercolour pencils! They are just so much fun! My little boy did his own elephent while I was doing mine, I shall show you once he's glued it all together to finish his card! He did such a fantastic job, I showed him the basic concept and away he went! He loves doing these things as it's a great way to spend time with his mommy. Awwwww! He owes it to me, really, do you know how many alien and superhero games I've played over the years? (Rhetorical question, of course!)

     So there you have it, my version of this cute birthday card! And the fact that I have been able to get this blog post done is a cause for celebration! Notice the pun in the title? Did ya? Did ya? Huh? Yes, I do think I'm funny. Just ask my husband.

Until next time folks, and hopefully that time will be in the very near future, Happy Crafting!

If you're just itching to try some crafting out yourself, give me a shout! It's much easier than it looks! And what you don't know how to do, you can easily learn! Go on... try it! :)


Saturday 9 June 2012

Bright Blossoms and Lace Curtains

Hello again friends and visitors,

     Today I bring you some flowers and sunshine, which is interesting considering the weather outside is rainy with gale force winds!

     Wanting to rise above the rainy, cloudy, windy day feeling, I decided to play with a stamp set called Bright Blossoms to cheer myself up. Bright Blossoms is a lovely little set, quite inexpensive as well, with lots of interchangeable images.

     When I took this set out to start crafting, all I could think of was vases sitting on windowsills. I reached in my scrap bin and pulled out a piece of cardstock that seemed just big enough, and it happened to be Crumb Cake. I found another piece of Whisper White that was slightly smaller, and was at first going to just layer the white over the Crumb Cake. I looked through my larger scraps and found a long piece of Blushing Bride 29.6cm x 10.5cm, so I scored that at 14.8cm and had a card with a long flap rather than the traditional a5 card.  Still the same size when folded, but it's half an a4 sheet the long way and not the short way.

     So now I had my Whisper White, Crumb Cake, and Blushing Bride. Well, it just so happens that I recieved from Stampin' Up! a product I had ordered a while back that was out of stock, some StazOn White (Opaque) ink. I was a bit disappointed that it didn't come with the rest of the order I had placed with it, but I do love seeing the UPS man! He's my own personal Santa.

     Unlike Whisper White Craft Ink, the white StazOn ink (also from Stampin' Up!) does not require lenghty time to dry nor does it require heat-setting. It's perfect for stamping onto surfaces like plastic, glass, and anywhere that you may need a permanent image. The pad comes un-inked, to prevent drying out in the warehouse. I simply had to put about a teaspoonful of the ink onto the pad, and massage the ink into it with the ink bottle's nozzle. Then, after a minute, I was ready to use it!

     At first I was looking for a way to stamp something into the background with the StazOn, but couldn't decide on a stamp to use for this. I was thinking of using the Delicate Doilies set for the background, but upon looking at the stamps in that set I decided that one of them looked a bit like a sun, and that I could stamp it in the corner of the white piece of card. Spontaneous inspiration!
     It was the one with the points that reminded me of a sun, so I stamped it in So Saffron with some Peach Parfait daubed in the centre. I then decided to make this into a window setting, so used my Word Window punch to cut out the inside of the Crumb Cake. I used Simply Scored first to run a score line 1/2" in from all sides to form a rectangle, just for a guide. This way I didn't have to mess with a ruler and pencil, and a score line is much easier to see than a pencil line anyhow. So I punched along the score line, thereby cutting out the inside bit and creating for myself a frame for my window.

     I stamped the Crumb Cake frame with the Woodgrain background stamp in the white StazOn ink, and daubed the inside and outside edges with Early Espresso. In doing this, I discovered that when you daub colour over the white StazOn ink, it will not ink where the white StazOn has been stamped. Must keep that in mind for future reference!

     To finish my window setting, I used Bright Blossoms, Stampin' Write markers and my Stamp-a-ma-jig to position the vases and flowers exactly where I wanted them, with every piece in the colour I wanted. So easy! I knew where I was going to put my window, and wanted to spice up the background "wall" a bit, so cut up one of the Nursery Nest Designer Series Papers into strips and stuck it to the Blushing Bride background.

     Since I had now created what seemed to be a piece of a room (most likely a kitchen) with a window looking out into the sunshine, I wanted to put some curtains on the window. Lace curtains seemed most appropriate since most curtains in England seem to be lace. I thought Vellum paper would do very well for this, as it is quite transparent, so stamped with the largest image from the Delicate Doilies set onto it with the white StazOn ink. I was so impressed because it looks just about as close to lace as you could possibly make with stamps on paper!

     Originally I wanted the curtains to hang vertically, and be gathered at the sides, but wasn't too sure how the Vellum paper would take to folding. I knew I wanted to use the Eyelet Border punch along the bottom, so did that, and decided to score just at the very top of the piece of Vellum paper to test how it would act when folded. It made a very tight crease, and as I messed with it I decided it looked nice folded horizontally, so kept with that and made it look like a Roman shade.

     To create the Roman shade look, I scored in a pattern of 1/2", 1/4", 1/2", 1/4", and so on, and folded the 1/4" wide strips behind the 1/2" strips in a pleated fashion. I punched holes in the pleats on the left side with the 1/16" circle handheld punch and threaded white Baker's Twine through it. I tucked the end behind the top of the curtain and adhered the Vellum paper to the Blushing Bride card with a long piece of Sticky Strip. At the end of the piece of Baker's Twine I made a paper bead, coloured it with a marker, tied a knot to keep it in place, and frayed the end a bit to make it look like a tassel.

     Before sticking the window onto the wall, I punched three tiny holes at the bottom of the window frame, and attached some mini silver brads. I stamped three teacups from the Tea Shoppe set, cut them out, and hung them from the brads, securing the window to the card with Tombow glue and securing the teacups with dimensionals to make them a little more 3D.

     And then I had..... THIS!


     If you skipped over the blah, blah, blah part and when straight to the photo, here's a list of what I used:

Stamps/stamp sets: Bright Blossoms, Delicate Doilies, Tea Shoppe, Woodgrain
Paper: Blushing Bride, Crumb Cake, Whisper White, Nursery Nest DSP, Vellum paper
Ink: White(Opaque) StazOn ink pad, Riding Hood Red, Blushing Bride, Pear Pizazz, Baja Breeze, So Saffron (all in marker form), Peach Parfait, Early Espresso (with sponge daubers)
Punches: Word Window punch, Corner punch, Eyelet Border punch, 1/16" circle punch
Embellishments: Baker's Twine, Mini Brads (silver)
Other: Simply Scored, Sticky Strip, Tombow mulitipurpose glue, Dimensionals

     The hanging teacups remind me of a cup-rack I built in the US. I covered it with coloured tissue paper and glue in a plaid pattern, and put a bunch of hooks in it. I installed it beneath a cupboard and we were then able to display our collection of mugs (I really like mugs, especially ones I've painted) in a cute way rather than putting them away out of sight. This card really creates a bit of a nostalgic feel for me and makes me feel like huckleberry coffee is brewing and pancakes are on their way to my plate. Makes me smile. :)

   Lengthy one, I know, but I hope it's brightened up your day just a bit!

Thanks for reading, and Happy Crafting!


Wednesday 6 June 2012

Tea Shoppe

Welcome!

     Fancy a cuppa?

     Today I bring you a couple of creations made with the new Tea Shoppe stamp set. This was honestly not at all one of my favourites at first, but it has gradually grown on me. It features a fantastic "Just for You", a dotted border for the Modern Label punch, and much more!
    This cute little box was inspired by Michelle Last's little treat box I recieved several months ago. It is so simple yet so effective, just a piece of card 8" x 4", scored at 4" in the middle (creating two sections 4" x 4"), then a score line pulled from halfway down the edge (@ 2") to the top of the centre score line, and the same done toward the bottom of the centre score line. Simply fold along the lines, punch holes at the top and thread a ribbon through to tie it shut! Hopefully by the shadow in the picture you can tell that it is a 3D treat box, which may help you to imagine what I was trying to explain.

     The sentiment "Just for You" and the dotted frame came from the Tea Shoppe set. Also used were the Woodgrain stamp, Bird punch, Scallop Circle punch, Modern Label Punch, smallest circle punch from Itty Bitty Shapes punch pack, Chocolate Chip, Night of Navy and Real Red inks, Crumb Cake, Very Vanilla, Garden Green and Real Red cardstock, Color Spritzer tool, mini silver brads, and some Victoria Crocheted trim.

Here is what you will get in the Tea Shoppe stamp set:

     Whenever browsing stamp sets, always think of them in pieces rather than one whole stamp. With the helpful invention of Stampin' Write Markers, You can colour your stamps in any combination of ways. You can use just parts of the stamp, you can make it multicoloured, the possibilities are endless! For example, instead of using the stamp with the three little cups which comes as one piece, I stamped each one in a different colour and cut them out and stacked them up. While I would love to claim it was my idea, it was actually a CASEd (CASE = Copy And Share Everything) idea from a very talented lady. Her name is Amanda Burditt, and it wasn't until I saw a card she made with the teacups in bright colours that I actually wanted to give this set a closer look!

     For this card I used the Tea Shoppe stamp set, Patterns Designer Series Paper (getting started pack), Marina Mist and Whisper White cardstock, Regal Rose, Rich Razzleberry, Marina Mist, and Sahara Sand ink, VersaMark, white embossing powder, Pearls, a Big Shot, Swirls and Scribbles die, Framelits, Edgelits, and Adorning Accents embossing folders.

    I have been recently playing with the new Framelits and Edgelits dies for the Big Shot, but this is the first time I've got to use the new embossing folders that coordinate with the Edgelits dies. Since they are designed in the US, and standard US cards are about 1cm smaller than ours, the embossing folders don't quite stretch across the entire length of our cards. To counteract this, I strategically placed the Framelit cutout just over the embossed scallops so I could snip in between two scallops and just spread them apart to reach the ends of my card.

     The Edgelits dies, however, are just long enough to cut the length of an A5 sized card, so no issues there. If you've never seen them, they are just long pieces of some kind of metal, flat on one side and with a sharpish ridge on the other side. Two come in the package, with an envelope to store them as they would easily get lost without it. You can ensure they stay put with just a sticky note, and with the help of the Big Shot (my love!) they instantly give you a fancy edge to your card. Check out the Summer Mini catalogue on the left-hand side of this page for some more examples!

     I did have a lot of fun playing with this set, and after telling myself for ages I didn't even like it, I now can't wait to play with it again! I have seen it used by some talented fellow demonstrators in small cards that contain a wrapped teabag inside, which I can't wait to try myself! "A CUP OF THANKS"  is a perfect sentiment for it, very clever.

     What do you think? Does this set suit you "to a tea"? Which stamp is your favourite? How would you use it/like to see it used? I'd love to hear from you!

Thanks for reading, don't let your tea go cold (as my husband is constantly telling me!), and Happy Crafting.


Exclusive Stamps!

It's good to be a hostess!

Why?

     When you host a qualifying workshop (crafting party) or place a qualifying order, not only do you get at least £25 in freebies of your choice, but you have EXCLUSIVE access to certain stamp sets and other special goodies!

     In the main catalogue, one of the special hostess sets is a very useful one with loads of different Happy Birthday messages. It's called Happiest Birthday Wishes. I made a very simple card with this set last night using just a bunch of differently sized and coloured circles pressed onto Very Vanilla cardstock using the Big Shot and an embossing folder.
     I've used Crumb Cake, Chocolate Chip, Rose Red, Rich Razzleberry and Very Vanilla cardstock, Chocolate Chip ink, Decorative Label punch, 3.4", 1", and 1-14" circle punches, the small circle from the Itty Bitty Shapes punch pack, Big Shot, Square Lattice embossing folder, and some Victoria crocheted ribbon.


This card is perfect for any woman whose birthday you've managed to forget, and my son could have made it, it's so easy.


     The exclusive hostess stamp set from the new Summer Mini is called Pedal Presents, and it features a bicycle with a basket and lots of little images such as flowers, hearts, balloons etc to put "in" the basket. I had a play with it tonight and really enjoyed myself!

     I used Pedal Presents, Tiny Tags and Everything Eleanor stamp sets, Chocolate Chip, Very Vanilla and Cherry Cobbler cardstock, Basic Black, Cherry Cobbler, Baja Breeze, Basic Gray and Crumb Cake ink, VersaMark and Cherry Cobbler embossing powder, Eyelet Border punch, Big Shot and new Framelits dies.


This is a good month to stock up on loads of wonderful Stampin' Up! goodies! They're good for the soul! Have you thought about hosting your own workshop soon? It's so easy! And so much fun! Get in touch with me ASAP!


That's it for today, but I hope you stop by again soon!


Thanks for reading, and Happy Crafting!

Monday 4 June 2012

June Freebies!

Is it June already??

It is! Where did May go? And so quickly! Oh my...

Before we get too far into June, I have to tell you about what Stampin' Up! is offering this month!


     It says it right on the picture, you can get a FREE package of Designer Series Paper when you buy three in the month of June! There are so many to choose from, why not have a peek in the IB&C and the Summer Mini and find your favourites? Just click the links on the left-hand margin of this page.

     Secondly, this is a great month to host a workshop! For workshops whose sales exceed £325, Stampin' Up! is giving hostesses an extra £30 of hostess pounds (to use on ANYTHING) for free! That's in addition to the £50 of hostess pounds you would already earn for hosting that kind of workshop, totalling £80 of FREE GOODIES and one item at 50% off!!
     What have you had your eye on that you would love to get for FREE? A Big Shot? What would you get for 50% off? The whole set of markers so you can have unlimited stamping capabilities? Why not host a workshop? You could possibly earn them just for your hospitality and for inviting people you know!

     For more information about these things and more, visit www2.stampinup.com or get in touch with me via any of the ways under the Contact Me tab at the top.

I'll have pictures and more for you very soon, but until then, Happy Crafting!

Thursday 24 May 2012

Notelets!

Hello friends!

     Today I am going to start by showing you a set of notelets I made using some leftover Sale-a-Bration Designer Series Paper (DSP), before moving on to something containing only current and new products (except one thing, I realised!). Try to keep in mind that by simply switching out the paper, ribbon, brads and stamps, you can easily create your own version of this first set of notelets. For those of you who are looking for things to do with your leftover SAB DSP, I hope this can inspire you!
     I started with a design I was shown at a Quarterly training, demonstrated by the lovely Michelle Last. She showed that we can easily create a set of notelets with a 12" x 12" sheet of paper, by cutting it to 25cm x 25cm and scoring it at the 7cm and 8.5cm mark on all sides. Then cut the corner squares out along the inner score lines, and you have created the basic pouch and can use the corner pieces (after trimming them slightly) as the fronts of your notelet cards! Notelet cards are typically 3" x 3", or 7.5cm square when folded. To get four notelet bases out of one sheet of a4 cardstock, cut the notelets to 7.4cm x 14.8cm and score in the middle at 7.4cm and you can cut down on waste without drastically changing the size of the notelets!

     The notelets fit nicely into the little pouch with their little envelopes. To hold my notelet pouch closed, I used the Postage Stamp punch (from the Spring Mini- may or may not make its way into the main catalogue in the fall) to punch out some Poppy Parade cardstock, and cut two diagonal slits where the corners of the postage stamp would go, so I could slide those corners in and hold the pouch shut.
     I used the Scallop Trim Corner punch on the corners of the front flap, and layered some Poppy Parade behind it to add some colour. I made four different notelets to go inside, and I think they are very classy! The bases of the notelets are Naturals Ivory cardstock.

     On this first one, I hand-stitched around the heart (punched out with the Full Heart punch), which I love! I wrapped the linen thread around the edges and secured the ends on the back with glue dots, and stamped the sentiment (from the Thank You Kindly set) with White Craft ink in the centre of the heart and set it with the heat tool. I used a brad to add just a little something else... The brad pictured is a product Stampin' Up! released in the US for the US Sale-a-Bration, which I purchased online from a US demonstrator. It came along with some pretty organza ribbon, which I have used on some of the notelets below. I don't normally buy things that I can't sell, but in this case I just couldn't resist!
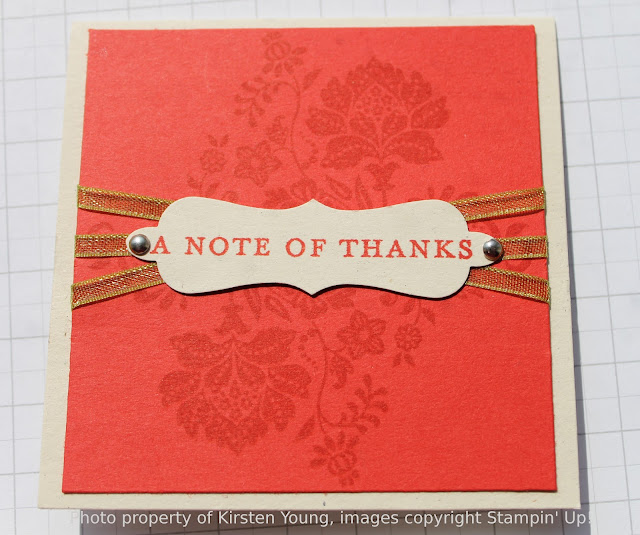
 For this next notelet, I used the Sale-a-Bration stamp set Fresh Vintage and my Stamp-a-ma-jig to stamp (and sticky notes for a mask!) with Poppy Parade ink onto the Poppy Parade cardstock. I wrapped the ribbon around so it formed an elongated "x" with a line vertically through the centre. I stamped "A NOTE OF THANKS" from the Thank You Kindly set onto some Naturals Ivory cardstock, and punched out with the Decorative Label punch. To make this shape, punch just above the sentiment, attach to a sticky note, and put back in the punch to punch in the same fashion along the bottom of the sentiment. It does take some practice, but it gives a very unique shape that is just begging to be secured to the card with brads!
     Taking a break from the standard square, on this next notelet I made each square into a scalloped square, using the Scallop Edge Border punch. I'll have to make a whole tutorial to explain how to do this, as I can't seem to find the right words, but you can find a nice tutorial on Split Coast Stampers. I stamped "A NOTE OF THANKS" onto Naturals Ivory cardstock, cut it into a rectangle, and snipped the end by hand. I secured this onto the card with a large brad.

     The last notelet of this set is very simple and sweet. I stamped "Thank You" onto the DSP, layered it over the Poppy Parade, and made a little bow out of the ribbon. To make this bow, wrap the ribbon around two fingers until you have created two complete loops, then take the ends and tie them around the centre of the loops. By "tie" I mean just a half of a square knot, like the first thing you do with your laces when you tie your shoes.

     Over the centre of the bow, I attached the brad by wedging the bow in between the prongs of the brad, and inserting the brad through a hole I punched in the card front. I then opened the prongs to lay them flat against the back of the Poppy Parade, and that was it!

     Last but not least, I created some coordinating envelopes to go with the notelets. These are just the mini square envelopes from the main catalogue, which I stamped in Soft Suede with a stamp from the Fresh Vintage set. I stamped another image from the same set (the postage stamp looking one), in Poppy Parade onto Ivory Naturals cardstock. I punched them out with the Postage Stamp punch from the Spring Mini catalogue and attached them onto the corners! Ta Daaaa!!!

     Now that I have possibly bored you and/or frustrated you (hopefully not!) by my use of discontinued and/or unobtainable-until-further-notice products, I would like to share with you the second set of notelets I made, using only currently-available products (except for one punch, sorry!). The style of this next set is completely unlike the style of the first, as you will soon see. This is one reason Stampin' Up!'s products are so amazing; they are so versatile and you can make each card or project your way. Of course you can Copy and Share something someone else created, but one of my favourite things to do is make something using only the inpiration that pops into my head.

     This is one of those instances where I tried to make something I've never seen before. I think the colours and the style really are a reflection of some part of me. 

     I remember when I was nine years old, I wanted to bring Valentine's day treats for all the kids in my class. It's an American thing (so I understand, I may be wrong) for all the children in the class to bring one Valentine for every class member, and trade them on the day. Sometimes they come with sweets, sometimes not. So a lot like swaps at our demonstrator events, then! Anyway, when I was nine, my mom and I spent a lot of time making little origami boxes for everyone using wallpaper samples which we had picked up for free from a store that was closing down. I think we made 24 boxes with lids, and I loved it!

     So for this set of notelets, I wanted to make an origami box to hold them. Since cardstock is a bit thick, it helps if you score folding lines into it to help the process go nice and smoothly. This is where Simply Scored proves its worth, and the Diagonal Plate too! I'm not going to explain just yet the instructions on making the box, I'll save that for another tutorial. But I would love to show you how I decorated everything, and I will tell you that the base of the box was 25 cm square before it was folded. 

This is the top of the box, which coordinates with both sets of notelets contained within:
      Once the lid is removed, you can see that I've stamped the stars again onto the sides of the box with Melon Mambo ink:
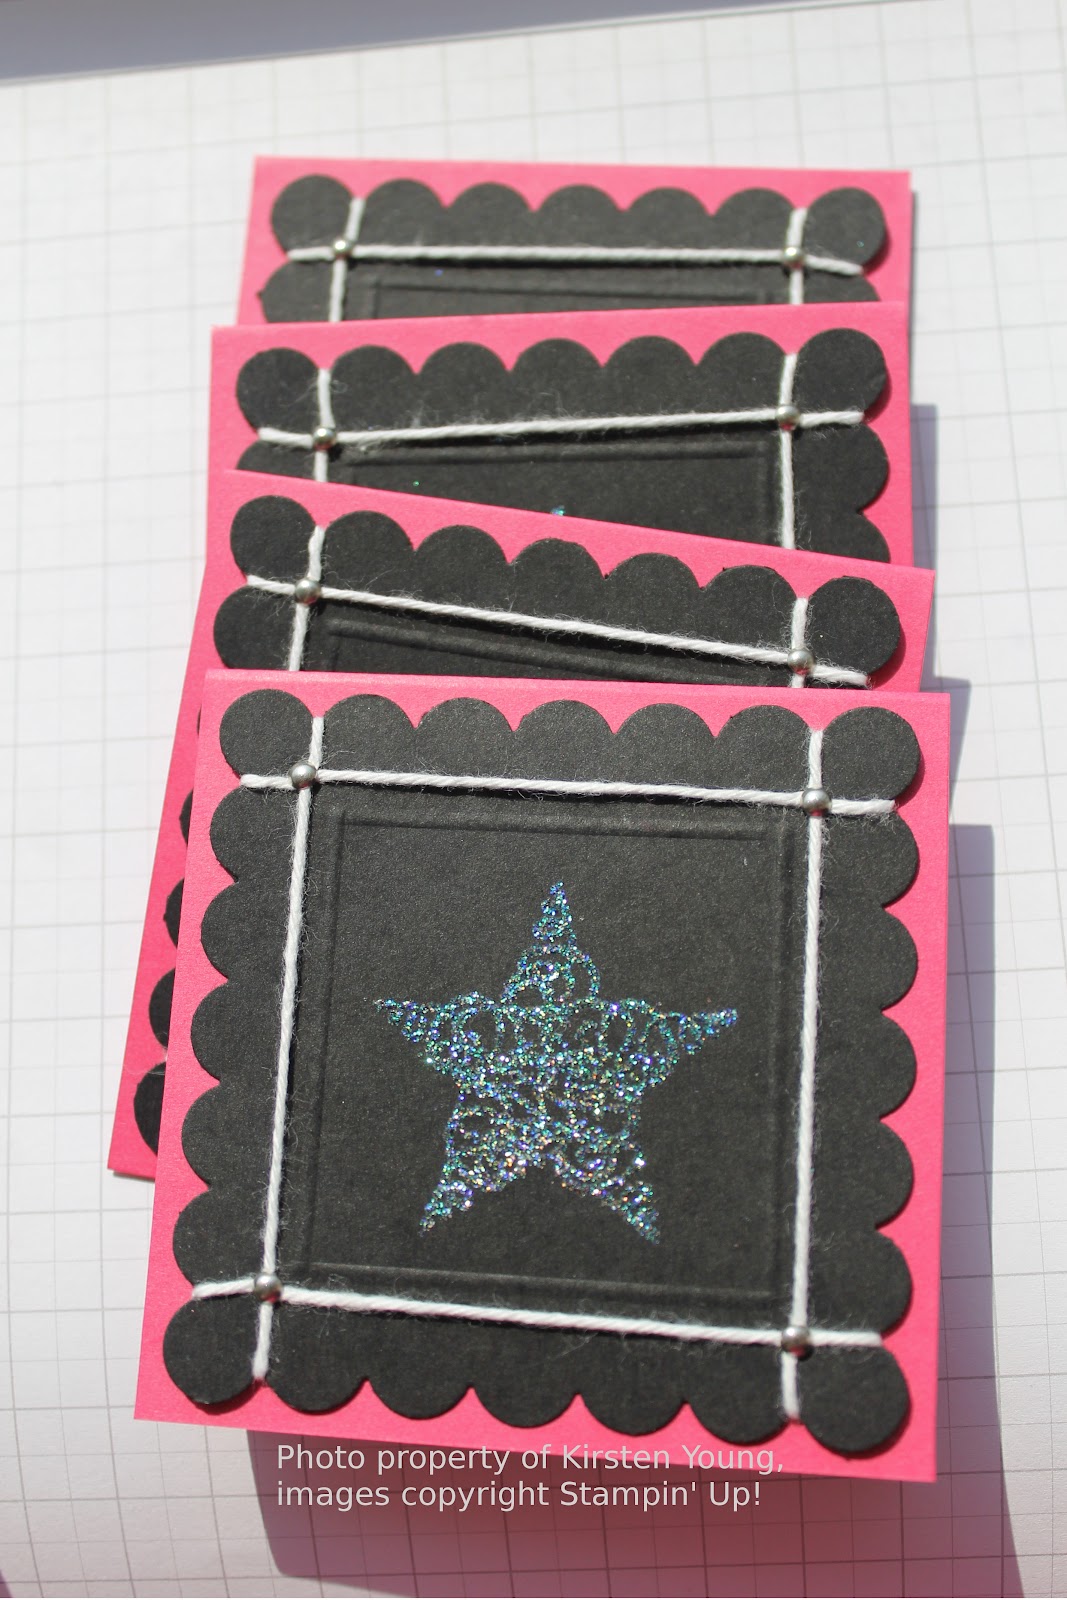
      Inside the box are eight notelets. The first four have a Melon Mambo base, with Basic Black on the top. With the Basic Black squares, I have punched them into scalloped squares with the Scallop Edge Border punch. Onto this I have stamped the Stylish Star a la carte stamp with Versamark and embossed with Heat and Stick powder. This makes the image sticky, which is very useful when you want a solid glitter image. I applied the glitter after heating the first time, and heated it again after tapping off the excess glitter to permanently set the glitter into the image.
     After embossing, I put a glue dot behind one of the corners of the scalloped square to hold the Baker's Twine as I wrapped it around the edges. I wrapped up, then around the corner, to the left, around the corner, then down, around the corner, and to the right, and stuck this end onto the same glue dot as the first end. I punched tiny holes with the 1/16" Handheld Circle punch, and attached brads by strattling them over the intersection of the strings. To add a little detail, I used Simply Scored to add a raised frame just inside the border created by the twine.

     The second group of notelets has a Whisper White base, two strips of Basic Black cut out with the Dotted Scallop Ribbon Border punch, a large scallop circle (from the Spring Mini... sorry again!) in Melon Mambo and a 1-3/4" circle of Whisper White. I have left the base and the black strips plain, but to the edges of the Melon Mambo scalloped circle I have brushed my 2-Way Glue Pen around the edges, and dipped them in glitter. To the Whisper White circles I have stamped the Sylish Star in Melon Mambo ink, and brushed the edges of the circles onto the Melon Mambo ink pad.
      Finally, I have stamped the Stylish Star onto the upper right hand corner of the envelopes in Melon Mambo ink, which completes my little box set! These are the mini envelopes from the main catalogue again, just like the first set of notelets.

     There we have it, two completely different sets of notelets, ready to be grabbed off the shelf to write a quick note to say "Thanks" or "Congratulations," etc. I really like the idea of leaving them blank so they can be used for anything at the drop of a hat, but you can never have too many Thank You notes! In fact, just having them around may encourage you to give thanks more! And that can't be anything but good!

     Speaking of thanks, Thank You so much for stopping by to let me share with you, and please do share my blog with anybody and everybody. It would be much appreciated! And if you haven't already, please click the link at the top of the page and "like" my facebook page if you can. If you have already done so, Thank You!!!

Until next time, friends, Happy Crafting! And I do hope you get a chance to enjoy some of this sunshine!

Thanks again,


Wednesday 23 May 2012

Party Time!

     On Saturday, I had the privilege of providing the entertainment for fourteen ten-year-old girls. It was a blast! Everyone had so much fun (at least that's how it seemed) and did such a great job at covering a notebook with a matching pen and bookmark!

     The idea was that the girls would stamp onto the First Edition Specialty DSP (Designer Series Paper) and then stamp the Medallion with Versamark over the top, emboss in clear, and rub ink over that to create an emboss-resist effect.

     I didn't get to take any pictures at the party, as I was far too busy helping the girls to be messing with a camera! I have no pictures of the pens or bookmarks, but here is a photo of the notebook I did as an example. DEFINITELY not my best work, I am merely showing the photo to give you an idea of using the Medallion for the emboss-resist effect.


     Just a helpful hint: If you're thinking about stamping words onto this DSP, make sure the words you are using are quite large or you may want to reconsider. Small words on top of other small words just doesn't look very good, and trying to cover them up may ruin your project entirely!! (Depending on your definition of "ruin," of course.)

     I was so impressed with some of the things the girls came up with. Some of them rubbed Rich Razzleberry or Marina Mist ink over the top instead of Early Espresso like I have done, and the result was stunning! It was so interesting to see how creative they could be with the stamps and inks in front of them.

     For the pens, I searched all over and FINALLY found one (by Uni-ball) with a clear barrel and easily removable ends (i.e. not involving pliers or broken nails) so we could put a piece of stamped paper on the inside to personalise them. I was very pleased to have found the pen, but soon discovered that most DSP wouldn't work because it was too thick. The First Edition Specialty DSP is a little thinner, so just BARELY fit into the pens! It was really tricky, one wrinkle and you had to start all over with a new piece of paper! I found a trick to it, though, if I ever want to use that idea again. Roll the paper into a cylinder,  put it in halfway up the barrel starting from the bottom (the end where the tip usually goes), carefully insert the ink tube in the centre of your paper cylinder and as you do so, feed both the paper and the ink tube into the barrel all at once. Then simply replace the tip cover and you're done!

     The bookmarks were just flowers punched out using the Fancy Flower and 5-Petal Flower punches, with another little flower from the Itty Bitty Shapes Punch Pack, secured to the top of a large paperclip. To secure them, I punched out strips of paper using the Word Window punch and applied Sticky Strip to them, so that the girls could just peel off the plastic of the Sticky Strip and stick it right onto their paperclip and flowers. Doing it this way made the bookmark assembly very easy and straight-forward for the girls, especially as I had pre-punched and distributed all the shapes and pieces into little kits for the girls to have at their seats. Definitely the easiest project of the afternoon!

     Part of my services for birthday parties is that I provide a little Thank You gift or card for each girl to take home, as well as the handmade invitations for the party, at no extra charge. Included with the card or favour is my business card because the girls have so much fun, I hear a lot of "I want to do this at my birthday party!" By doing this, they all have a way of contacting me if they need to.

This is an example of a birthday party invitation that I made for a birthday in April.

     It was created by rubbing the ink pad (Bashful Blue, same colour as the cardstock I used) onto the flatter side of the embossing folder before putting the cardstock through the Big Shot, thereby inking the background of the card whilst allowing the embossed images to "pop." This was a tip I learned from a fellow domonstrator, Martin Stone. I have been using this technique every chance I've got ever since!

     The other supplies I used to make this invitation are: Outlined Occasions stamp set (from the last Sale-a-Bration, no longer available), Melon Mambo embossing powder, Melon Mambo marker, Dotted Scallop Ribbon Border punch, Patterns DSP, Whisper White cardstock, Beautiful Wings Embosslits die, Elegant Bouquet embossing folder, and Rhinestone jewels.

As all the girls went home, they each got to take with them one of the favours I made.

     These were so much fun to make! I used: Candy Wrapper Bigz L die, Cupcakes stamping wheel, Thank You Kindly stamp set, Cupcake Builder Punch (retired), 1-3/4" Circle punch, Cheerful Treat DSP, Whisper White cardstock, Wisteria Wonder cardstock, Perfect Polka Dots embossing folder, and Simply Scored.

     I cut out the candy wrappers with the die, and rolled down each panel with the Cupcakes wheel in Concord Crush ink. For the effect on the cupcake bottom, I used Simply Scored to score every 1/8" and then flipped them over and scored every 1/8" again, in the spaces that hadn't been scored the first time. This made it really look like a cupcake's paper bottom. I used a Sponge Dauber to lightly colour the edges and the raised lines with the Concord Crush ink. I sponged the shimmer paint onto the cupcake tops, embossed the circles behind the cupcakes with the embossing folder, and stamped the sentiments in Concord Crush onto Whisper White cardstock and cut them out by hand.

     I don't know about you, but I am really chuffed with them! I know you can only see one, but trust me they all looked great!

     Well that's all for today, folks! But stay tuned, there will be some really neat things coming up in the next few days!

Thanks for reading, and Happy Crafting!


Friday 18 May 2012

A Sweet Suite- Featuring a Candy Wrapper Diagram

Hello friends, how sweet of you to stop by!

     Today I would like to share with you a number of things, not the least of which is a diagram for making your very own paper candy wrappers in any size you like! This means you can easily wrap up pens or pencils, long rolls of sweets, or just about anything you want! Stampin' Up! does sell a candy wrapper die, which I do love, and find extremely useful when making large quantities of candy wrappers because it cuts and scores all at once. But obviously you really only have one choice of size unless you fold the paper in half when you put it through the Big Shot and do funny things with it that way, but it will mean that you end up with creases in your paper. That's not a big deal if you're going to cover up the centre bit anyway, but for nice clean lines, less headache and the ability to choose my own width, I prefer to use my new best friend: Simply Scored.

     I LOVE this tool! Not only can I add dimension to my crafts by using it to create borders and other emphasising lines, but I love how I can easily make many kinds of packaging, including but not limited to, CANDY WRAPPERS! But first...

     On a post from a few days ago, I shared with you a candy wrapper that I had made using the simple formula. I had made an envelope using Simply Scored and because of the way I wanted the paper to look on the envelope, I ended up with oddly-shaped scrap pieces of the paper. I took the new Blossom punch to them, and punched out some blossoms. I layered these with other punched out bits of paper and then had several blossoms in Island Indigo, Whisper White, and Blushing Bride. After making the first candy wrapper with one of them, I decided to try to make a whole suite of items that coordinated with it.

The card:
     I loved making this card! I got to use a few punches that haven't seen any action in a while, and some new techniques and other products.  Also, I find Island Indigo a difficult colour to use, as I have trouble finding things with which it can coordinate, but in this instance I feel I've found a winning combination.

     I used: Mixed Bunch stamp set, Just Perfect Alphabet stamp set, Blossom punch, 1-3/4" Scallop Circle punch, Small Heart punch, Boho Blossoms punch, Itty Bitty Shapes (the scallop circle one) punch, 3/4" Circle punch, Scallop Trim Border punch, Scallop Trim Corner punch, 1/16" Handheld punch, Little Leaves Sizzlits Die, In-Color glimmer brads, In-Color designer printed brads, and Baker's Twine. The paper is Sweet Shop Designer Series Paper (DSP)- the Island Indigo one with the hearts-, Nursery Nest DSP- the Blushing Bride one with the lines and dots- Whisper White, Island Indigo, Blushing Bride, and Pear Pizazz. For ink I used Island Indigo and Blushing Bride.

     On the post before this one you may have already seen the first candy wrapper but here it is again:

     The recipe for this is essentially some combination of the supplies mentioned above, and the sentiment is from the new Sweet Cake stamp set. Also not mentioned above is the Scallop Oval Punch. I love how punching out the scallop oval in white and then daubing the edges with a different colour makes it look so different and so nice compared to leaving it just plain Whisper White!

     The next one I made is this:

     I used a masking technique to create the background for this. It was so easy because the stamp coordinates with the new Blossom punch! After stamping with Island Indigo a few times, I simply punched a few coordinating blossoms out of sticky notes so I could simply stick them onto the existing images, and then stamped in the gaps with Blushing Bride. That way the images don't overlap and it looks really cool! I also added a rhinestone in the centre of the flower here and coloured the petals and under the rhinestone with my Island Indigo marker.

     Although this candy wrapper is smaller than the first, the size difference is not dramatic enough to notice right offhand. To demonstrate that candy wrappers can truly be virtually any size, I made a little bitty one!

     The flower I created here was done using the Boho Blossoms punch and the Itty Bitty Shapes scallop circle punch. I added some Crystal Effects behind the rhinestone, and behind the flower is a strip of Whisper White punched out with the Dotted Scallop Ribbon Border punch.

     Now that I've shown you several examples of sizes, perhaps you would like to see the diagram?


          (Please pardon the writing, as writing with my finger on a touch-screen device does not usually work out as well as with a pen in my hand.)

     Just to explain a few things: "n" can be any dimension. To determine what you want "n" to be, think of what you want to wrap. Do you want to fill the thing with loads of sweets? Do you want it to be just big enough to put in a pen? Once you determine the width of the thing you want to wrap, you can then determine the size of paper you need to start. 

     I recommend using SU plain or textured coloured cardstock as Whisper White and Very Vanilla are a bit too thin for this type of packaging, as is DSP. Using anything besides the heavier card puts the paper at risk of breaking at the seams, simply because of the nature of this type of packaging.

     Okay, so you've found the width of the thing you want to wrap. You can make "n" slightly shorter than that, as the width of the item being wrapped is actually going to be the same length as one of the diagonal lines you see in the diagram, which is longer than "n". You could get all complicated with the Pythagorean Theorem and figure out an exact measurement, but that's just a bit too geeky so we'll just say that "n" can be slightly shorter than the width you require.

     Once you've decided what you want "n" to be, multiply that by 4 and add 1cm,and that will be the width of your paper (if positioned as shown). "n" + "n" + [however long you want the wrapper to be] = the length of the paper you need.

     When you have the paper cut to your required dimensions, and it is positioned as shown, score vertically at every "n", which should leave you with your 1cm at the end. Turn 90 degrees and score in from one side at "n" and rotate to the other end and score at "n" again.

     You can now score the diagonal lines. They should match up perfectly with the diagonal plate as they are all 45 degree angles, but since I don't have the diagonal plate as of yet I did it the more tedious but still effective way of placing a sticky note so it diagonally reaches the corners of each of the squares I've created, and lining that sticky note up with my scoreboard so that when I score vertically downward, I am putting in the diagonal lines I need. When I line the sticky note up the first time, I can score 4 diagonal lines at once, perhaps shifting the paper a little if need be.

     This is the part where the Simply Scored Diagonal Plate would really come in handy, because if I had to do any more than just a few of these wrappers, I would get very bored of having to mess with the sticky note each time. It is much faster and easier to line the paper itself up with the 90 degree angle on the scoreboard and have a perfect 45 degree angle to follow.


     Once all the lines are scored, I fold along the vertical lines and, while still folded, cut little notches out to form the little diamond and triangle shapes. Then simply fold along all the rest of the lines, adhere the seam edge to the beginning edge with some Sticky Strip or similarly strong adhesive, and fill and close!

     For detailed directions on how to close the candy wrapper, there is a wealth of information out there via a simple search on a search engine. Basically you gather the centres of all the end sides together, pinch and twist. I think it takes a bit of practice, the first time I used my Candy Wrapper Die I was stumped for a while when I tried to close it!


     So there we have it, a sweet suite using scraps (everything apart from the Island Indigo used to make the larger candy wrappers was from the scrap bin) ready to be given to someone who deserves a little gratitude in the form of chocolate and other goodies.


     Give it a try! If you've finally decided that Simply Scored is a must-have for you too, get in touch with me via any one of the ways listed under the "Contact Me" tab and I'll be happy to help!


Thanks very much for reading, please feel free to share this blog with your friends,
and Happy Crafting!